What they are
Sensitivity labels are a tool for classifying and protecting Microsoft 365 data based on its sensitivity or confidentiality level. At CU Boulder, sensitivity labels can safeguard their Microsoft files and emails, Teams sites, Microsoft 365 groups, SharePoint document libraries and PDF files against unauthorized data access and leakage.
Once applied, the label and its protections stay with the item even when it's shared between devices, applications or cloud services.
What they do
OIT has configured a set of sensitivity labels that map to CU's classification levels of institutional data and apply the appropriate protective measures for that data classification.
Please note: Labeling a file or email as confidential or highly confidential does not shield it from disclosure under the Colorado Open Records Act (CORA) if it is otherwise a public record subject to disclosure. For additional information, see the sensitivity labels FAQs.
Primary Labels
| Sensitivity Label | Description |
|---|---|
| Public (L1) | Data is not protected. Content was specifically prepared for public consumption. |
| University Data (L2) | Data is not protected. Content was not meant for public consumption but would not have an adverse impact if disclosed to the public. |
| Confidential (L3) | Content is sensitive, is not typically disclosed to the public, and requires a legitimate business purpose to access. |
| Highly Confidential (L4) | Content is extremely sensitive; is protected from disclosure by law, regulations, contracts or legal agreements; and/or requires reporting of unauthorized disclosure. |
Sublabels
The confidential and highly confidential labels have four different sublabels.
| Sensitivity Sublabel | Description |
|---|---|
| No Protection | Data is not protected; access is not restricted. Share only with trusted partners who cannot perform their work if the file is protected. |
| Internal | Data is protected; access is restricted to users with a University of Colorado email address (e.g., colorado.edu, cu.edu). Users can take any action, including removing protection (justification required). |
| External | Data is protected; access is not restricted to users with a University of Colorado email address. Users can take any action, including removing protection (justification required). |
| Custom | The owner assigns a permissions level to each user or domain. |
Each sublabel applies a different set of protections, depending on the sender's and recipient's needs.
| Sublabel Protections | No Protection | Internal | External |
|---|---|---|---|
| Applies an additional layer of encryption | |||
| Prevents access by unauthenticated users | |||
| Prevents access by non-CU accounts | |||
| Prevents printing & downloading | |||
| Requires justification to decrease or remove label |
How to use them
CU Boulder's sensitivity labels are available for use by all faculty, staff and students.
Label a Microsoft file
CU Boulder sensitivity labels can be applied to these Microsoft file types:
- Word files (.docx, .docm, .dotx, .dotm)
- Excel files (.xlsx, .xlsb; .xlsm, .xltx)
- PowerPoint files (.pptx, .pptm, .potx, .potm, .ppsx, .ppsm)
To apply a sensitivity label:
- Open the file in the corresponding Microsoft web or desktop app.
- Open the sensitivity labels menu by either:
- Clicking on the Sensitivity button on the Home tab
- Clicking on the shield icon in the title bar
- Select the most appropriate label or sublabel from the menu.
- Any protections associated with that label will be applied immediately.
For additional details, including screenshots, refer to this Microsoft Support article: Apply sensitivity labels to your files.
Label an Outlook email
To apply a sensitivity label to a new or unsent Outlook email:
- Open the email in Microsoft Outlook (web or desktop).
- Open the sensitivity labels menu by either:
- Clicking on the Sensitivity button on the Message tab
- Clicking on the shield icon in the subject bar
- Select the most appropriate label or sublabel from the menu.
- Any protections associated with that label will be applied immediately.
For additional details, including screenshots, refer these Microsoft Support articles:
Label a Microsoft Team
A team owner can change the sensitivity label on that team at any time.
- In Microsoft Teams, go to the team.
- Click Edit team.
- Under the Sensitivity heading, click the drop-down and select the appropriate label.
- Click Done.
For additional details, see this Microsoft Support article: Sensitivity labels for Microsoft Teams.
Set a default label for a SharePoint library
The owner of a SharePoint site has the ability to apply a default sensitivity label to one or more of the site's document libraries. The default label is library-specific, so owners can set different defaults for different libraries.
New files created within the library will have the default label applied within seconds. A user can then manually change the label to a higher or lower protection level as needed.
Please note: If a user uploads a labeled file to the SharePoint library, the default label will not override the preexisting label. For example, if your SharePoint library defaults to Confidential - Internal and a user uploads a file labeled Highly Confidential - External, the uploaded file's label will not change.
Label a PDF file
There are two ways to apply sensitivity labels to PDFs:
- Using Windows File Explorer (client download required; only for Windows systems).
- Using Adobe Acrobat Pro.
Method 1: Windows File Explorer (Windows only)
The no-cost Microsoft Purview Information client allows you to apply sensitivity labels to one or more compatible files at a time, including PDFs, directly from File Explorer.
If you're using a university-purchased Windows computer that's enrolled in Secure Computing, you can download the client from the Software Center. If not, you can download it from the Microsoft website.
To learn how to use it, visit Microsoft's Label and Protect Files in File Explorer in Windows page.
Method 2: Adobe Acrobat Pro
Adobe Acrobat Pro is available at no cost to CU Boulder faculty and staff. Once you follow the steps below to enable Microsoft Purview Information Protection, you can use Acrobat to apply sensitivity labels to individual PDFs.
To enable sensitivity labels in Adobe Acrobat Pro:
- Open Adobe Acrobat Pro.
- Open the Menu, then navigate to Preferences > Security.
- Tick the checkbox to Enable Microsoft Purview Information Protection.
- A new pop-up window will state that a manual restart of Acrobat is required to enable this feature. Click OK to continue.
- Click OK to confirm your selection.
- Restart Adobe Acrobat Pro to apply the new settings.
Once sensitivity labels are enabled, follow these steps to apply a label to a PDF:
- Open the PDF in Adobe Acrobat Pro.
- Navigate to All tools > Protect a PDF. (If that option isn't visible, click View more.)
- In the protection panel, click Select a Microsoft Sensitivity Label.*
- In the selection window, select the appropriate sensitivity label, then click Apply.**
- It may take a few seconds to process the request. Once finished, a banner will appear at the top of the document window to indicate that the file is protected with the selected sensitivity label.
*If a Microsoft Security pop-up window prompts you to sign in to Microsoft Purview Information Protection:
- Enter your IdentiKey@colorado.edu email and, if desired, tick the checkbox to Remember me for future access. Click Next.
- You will be prompted to grant Adobe Acrobat permission to access your Microsoft data. To continue, click Accept.
**If you can't read the text in the window, click Cancel, then try again.
What they look like
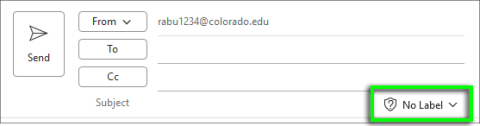
If a file or email hasn't been labeled, you'll see a shield icon with a question mark in the document's title bar or the email's header.
View screenshots of unlabeled files and emails
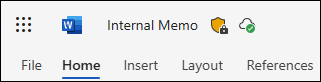
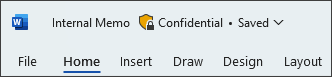
In contrast, a labeled item will display a brightly colored shield icon, often accompanied with the name of the sensitivity label. Click on the expandable sections below for example screenshots.
Word, Excel & PowerPoint
The sensitivity label appears next to the document name at the top of the window.


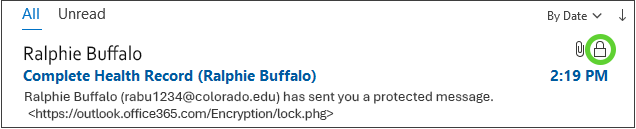
Outlook
In the inbox, labeled items are indicated by a padlock icon. In an open message, the sensitivity label appears either next to the subject line or below the message headers.
View Outlook (new) screenshots


Microsoft Teams
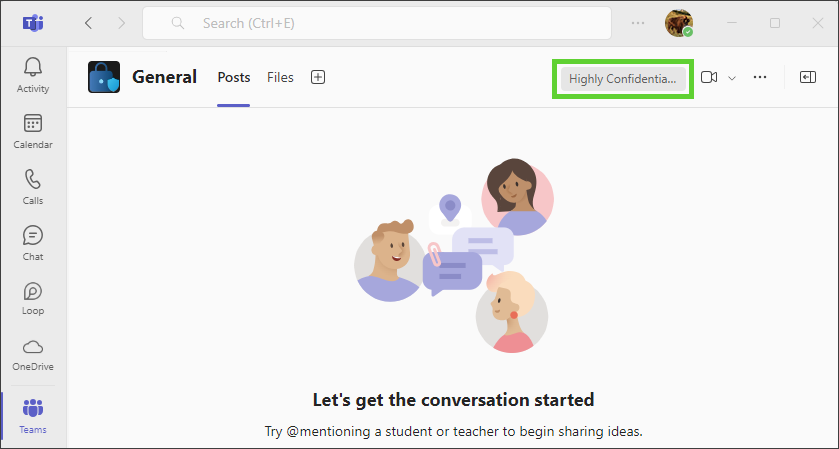
If a sensitivity label is applied to a Team, the label will appear on each channel in the tabs row at the top of the content pane. Learn how to label a Microsoft Team.
View Teams screenshot
SharePoint libraries
At this time, there's no at-a-glance method for checking a SharePoint library's default sensitivity label; however, that information is available through the library settings menu (see screenshot below). Users can add the Sensitivity column to view files' sensitivity labels in the content list.
View SharePoint screenshots


PDF files
When viewed through Adobe Acrobat or Microsoft Edge, labeled PDFs have a banner at the top indicating that they're protected. Non-Microsoft web browsers don't display protected PDFs; instead, they display an Adobe-branded landing page that states the document is protected by Microsoft Purview Information Protection and can be viewed using a supported PDF reader.
View Adobe Acrobat screenshot

View Microsoft Edge screenshot

View non-Microsoft web browser screenshot
