Resource Account Use
Resource accounts are typically used for conference rooms, equipment and other shared items within a department. The AutoAccept feature allows calendar invites to be automatically accepted by the resource if there are no scheduling conflicts. Double-booking of resources is available, but is not set by default. Only Exchange users can view the calendars for resource accounts, and permissions can be set so that only certain users can add events.
Request a Resource Account
Resource rooms to schedule conference rooms, office space, etc. should now be requested using the EMS system. To make a request for a new equipment or scheduling calendar account, submit a request to oithelp@colorado.edu and provide the following information:
- The name of a delegate for the resource. The delegate is the owner of the resource, will have full mailbox permissions and can set resource scheduling options. If you would like the delegate to be a security group, then you will need to provide an additional person to act as the owner of the account (owners cannot be security groups).
- A display name. Craft the appropriate display name by using the format guide found on the Resource Display Name Format page.
- The format should be determined by the type of resource and fit into the following format: [Campus Department Code]-[Resource Type]-[Resource Name]-[Room Location]
- A login name. This can be the same as the display name.
An OIT specialist will create the account and get in touch with you once it's created.
*Note: Please be aware that OIT will not add additional (individual) permissions on the calendar. The resource delegate will have full mailbox rights to the resource and will be able to set additional permissions as necessary.
Customize a resource account
Once the account has been created, the delegate can customize the settings. By default, all resources will be set to auto-accept meetings. This can be changed using Outlook on the web through Internet Explorer on a Windows system.
Possible settings:
- Resource Scheduling Options (conflicts, reminders, recurrences, etc.)
- Resource Scheduling Permissions (everybody can schedule, only select users or groups)
- Resource Privacy Options (customize the kind of information that is displayed in events)
- Response Message (write a custom response message that gets sent to those that schedule the resource)
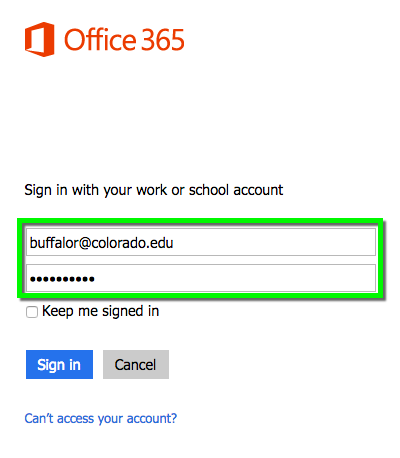
- Log into Outlook on the web using the delegate's IdentiKeyUsername@colorado.edu and Identikey password.

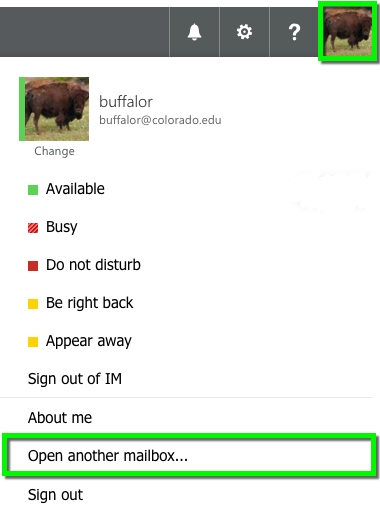
- Click the Account Image icon in the top right hand corner and select Open Another Mailbox from the menu.

- Type in the resource name or use the search directory to find the account. Once selected, click open.
- The mailbox will open in a new window. Click the Gear icon in the top right hand corner and select Options.
- Select preferred settings from the list of options on the left hand side panel.
- After selecting the options that best meet your needs for the resource, select save and log out.
- Your primary account window should still be open. Be sure to log out of that account as well.
Inviting, Viewing and Reserving a Resource
- To reserve a resource (e.g. a conference room for a meeting), invite the resource the same way you would invite a colleague.
- Opening a resource calendar in Outlook, Entourage, or iCal is the same as opening a colleague's calendar or folder. If the resource is available for you to see, you will be able to open it.
- In most instances, resource accounts begin with the department name and contain the building name or code.
- Review the Resource Display Name Format page to understand the format for resource account display names.